VBA for Excel Lesson 3:The Properties Window in the Visual Basic Editor of Excel
This is an excerpt from Pierre Leclerc (www.excel-vba.com)
Note: Print this page, open Excel and a open a new workbook. Use ALT/F11 to open the Visual Basic Editor as you learned in lesson 1.
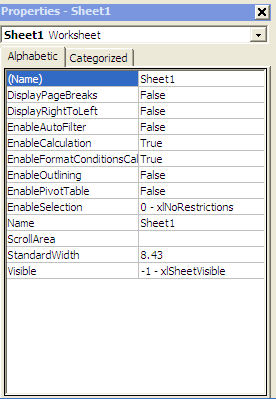
The Properties window shows you the properties of the component that is selected in the Project Window (single click). For example in the new workbook if you single click on "Sheet1" in the Project Window you see the properties of sheet1 in the Properties Window like in the image below.

As you can see, a worksheet has 12 properties that you can change in this Properties window. Notice that there are 2 "Name" properties. On the first line there is the programmatical name of the sheet (Sheet1). You will discover later the advantages and disadvantages of changing this property. The second "Name" property (9th line) is the name (or caption) that appears on the tab of the sheet in Excel.
Changing the "Name" Property
Exercise 3 (Create your first macro and use it)
Step 1: Go to Excel (ALT/F11) and notice the names on the three tabs of "Sheet1" as in the image below.
![]()
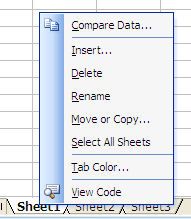
Step 2: We will change the name (Caption) on the tab of "sheet1" o "Introduction". To do so right-click on the tab of the sheet and the following dialog window appears:

Step 3: Select "Rename". The menu disappears and the name of Sheet1 is highlighted. Enter "Introduction" and this new name will replace "Sheet1" when you click "Enter". The end result is illustrated in the image below.
![]()
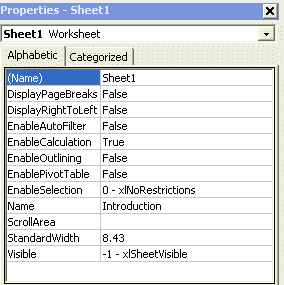
Step 4: Come back to the Visual Basic Editor (ALT/F11) and notice in the Properties window that the property "Name" (the ninth property, the one without the parentheses) has changed to "Introduction

As you have now learned the name of the sheet can be changed from Excel. We will now complete another smal exercise to change the name from the VBE Properties window.
Exercise 4 (Create your first macro and use it)
Step 1: In the VBE select "Sheet2" in the Project window. On line 9 of the Properties window double-cllck on "Sheet2" and enter the name Spreadsheet. Click "Enter"
Step 2: Go to Excel and notice that you now have a sheet named "Spreadsheet" .
![]()
Setting and modifying properties of objects in the Properties Windows is something that you will have to do a lot when you start developing userforms (see lessons 24 to 33).
Until then you will change a small number of properties including the very important "Visible" property of the sheets to one of its three values. To see the equivalent of the image below, select Sheet2(Spreadsheet) in the Project window. Click on the word "Visible" on the 12th line of the Properties window. A dropdown arrow appears in the cell to the right. Click on the arrow and you can select one of the three properties.

In lesson 3 of the tutorial on VBA for Excel you will discover how useful the "xlSheetVeryHidden" property can be. This property of a sheet can be used -- for example, to hide salaries in a budgeting application or prices in an estimation application -- making sensitive data inaccessible to the unauthorized users of your workbooks.
You will also learn how to name your modules and work with a few other properties of the objects appearing in the Project Window.
Close the VBE and close Excel without saving anything.
Go to the next lesson
Lesson 4: Code Window in the Visual Basic Editor

 Back home